The foam roofing installation process requires specialized equipment and high-quality materials to ensure a durable, effective roof system. Unlike traditional roofing materials like shingles or tiles, spray polyurethane foam (SPF) roofing is applied as a liquid that expands into foam, creating a solid layer across your roof surface. This single-piece covering eliminates seams and joints, which are common weak points in many roofing systems. Foam roofing stands out from other roofing systems because it forms a waterproof, seamless barrier that insulates your home and reflects sunlight. The material starts as two separate compounds that are mixed on-site and sprayed directly onto your existing roof deck. When these chemicals combine, they expand to about 20-30 times their liquid volume, creating a foam that hardens into a solid surface within seconds.
The benefits of foam roofing include excellent insulation properties, which can reduce your heating and cooling bills by keeping your home cooler in summer and warmer in winter. Foam roofs are lightweight yet durable, lasting a lifetime with proper maintenance. They can be applied over most existing roof materials, saving the time and cost of roof tear-offs. Additionally, foam conforms to irregular shapes and can seal around vents, pipes, and other roof penetrations, creating a truly watertight seal.

For homeowners looking for an energy-efficient, durable roofing option that can stand up to various weather conditions, foam roofing presents a compelling alternative to conventional roofing materials. Understanding the foam roofing installation process will help you make an informed decision about whether this roofing system is right for your home.
Preparing for Foam Roof Installation
With over four decades of dedicated experience in foam roofing installations in the San Francisco Bay Area, we have honed our approach, establishing ourselves as a leader in the industry. In fact, we have installed more residential foam roofs than any other company in the United States. This depth of experience underscores the specialized nature of foam roofing and Armstrong’s proven success in this field.
Preparing Your Roof
Before your foam roof can be installed, your old roof needs to be ready. First, your Armstrong Foam Roofing contractor will clean your roof well to get rid of any dirt, dust, or anything else that could stop the new foam from sticking properly. If there are any damaged spots on your roof, we will repair them first.
Weather conditions are critical for foam roof installation. The ideal conditions include:
- Temperatures between 50-90°F (10-32°C)
- Wind speeds below 10 mph
- Low humidity levels
- No rain in the forecast for at least 24 hours
The roof deck temperature matters too – it should be at least 5 degrees above the dew point to prevent condensation issues during application.
Preparation also includes protecting the surrounding areas from overspray. Our roofing contractors will cover nearby plants, vehicles, windows, and other surfaces with tarps or plastic sheeting.
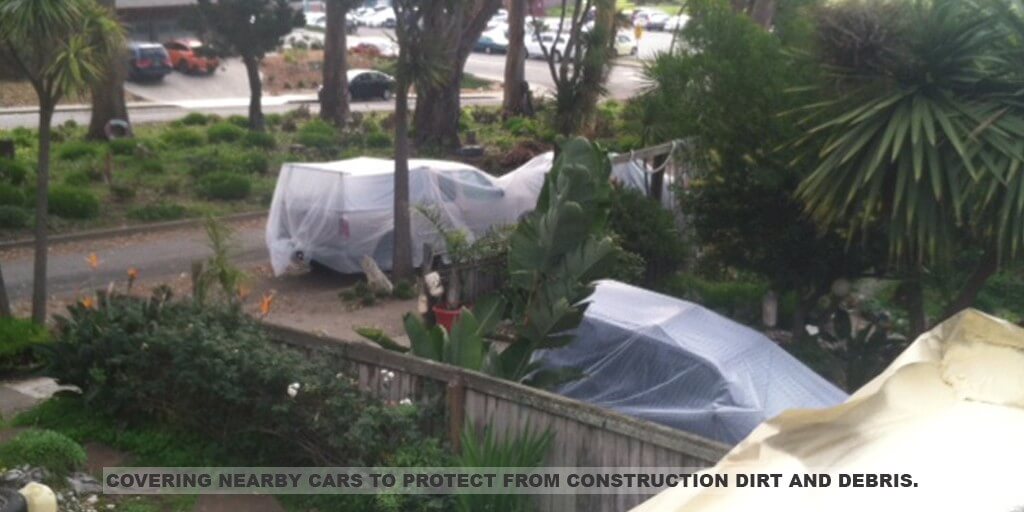
For homeowners, preparation might include clearing the area around your home, moving vehicles from the driveway, and keeping pets indoors during the installation. You should also inform neighbors about the upcoming work, as there will be some noise and possibly odors during the application process.
A well-prepared roof ensures the foam adheres properly and performs as expected for the lifetime of the system. While this preparation stage might seem time-consuming, it’s an investment that pays off in the long-term performance of your foam roof.
The Equipment and Materials Used
The installation of foam roofing requires specialized equipment and high-quality materials to ensure a durable, effective roof system. Understanding these components gives you insight into the complexity of the installation and helps you evaluate whether your contractor is properly equipped.
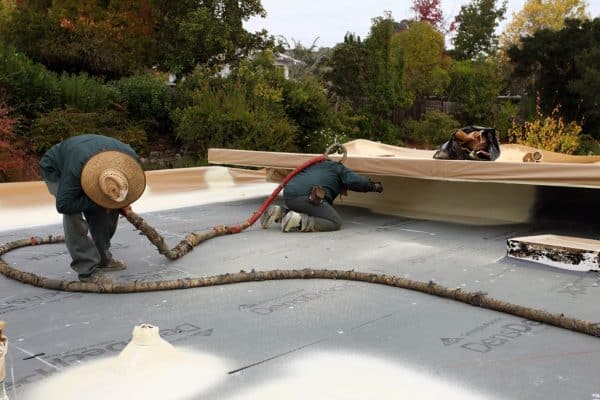
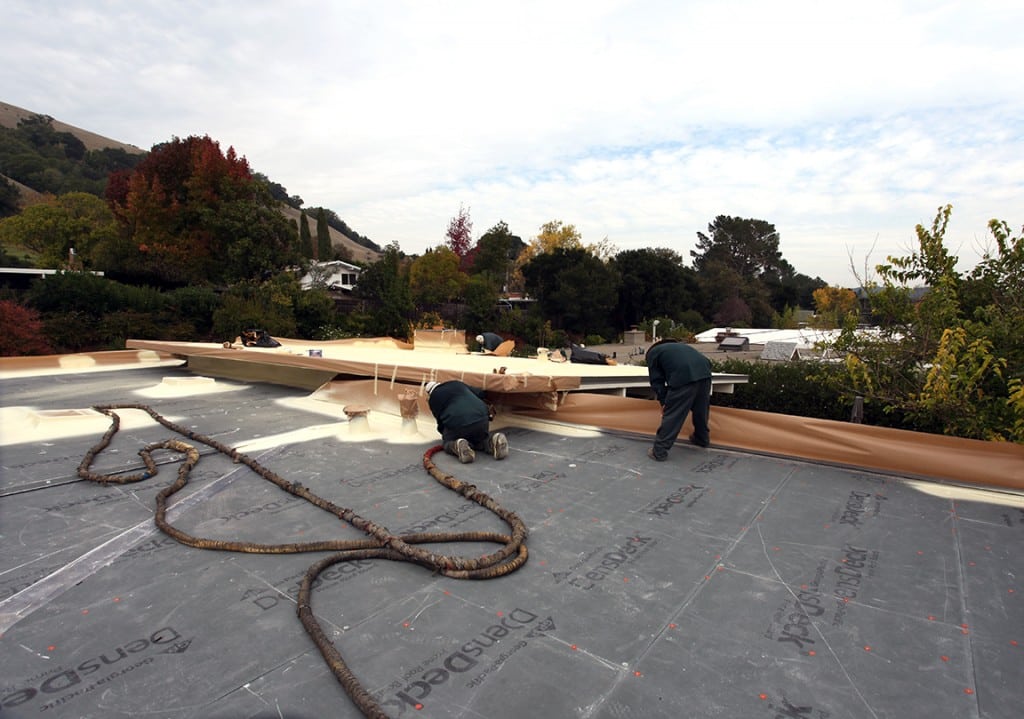
The primary application equipment includes a proportioner (also called a reactor), which precisely mixes the two chemical components of the spray foam. This machine heats the materials to the exact temperature needed for proper chemical reaction and maintains the correct pressure for application. Connected to the proportioner are heated hoses that transport the chemicals to the spray gun. These hoses must maintain consistent temperatures throughout their length to ensure the foam sets properly.
The spray gun is where the magic happens – it’s the tool that combines the two components at the point of application. Professional contractors like Armstrong Foam Roofing use specialized guns designed specifically for roofing applications, which differ from those used for wall insulation.

For the spray foam itself, there are two main components:
- Component A: An isocyanate compound
- Component B: A polyol resin blend that contains catalysts, flame retardants, and blowing agents
These components are stored in separate drums until they’re mixed during application. The chemical reaction between them creates the expanding foam that hardens on your roof.
After the foam layer is applied, protective coatings are essential. These typically include:
- Base coat: Often a silicone, acrylic, or polyurethane coating that protects the foam from UV damage
- Top coat: Usually contains reflective materials and granules for added protection and walkability
- Granules: Embedded in the top coat to provide slip resistance and additional UV protection
Other materials needed include primers for certain roof surfaces, caulking for detail work around penetrations, and sometimes fabric reinforcement for areas prone to movement or stress.
Your Armstrong Foam Roofing professional contractor will arrive with a fully equipped spray rig or truck containing all necessary equipment, generators to power the equipment, and sufficient materials for your entire roof. The quality of both the equipment and materials significantly impacts the finished roof’s performance, so it’s worth asking your contractor about the specific brands and types of materials they plan to use.
Spraying the Foam: How the Roof is Covered
Now comes the fun part! The workers will use their special spray gun to apply the polyurethane foam onto your roof. As we have mentioned, it comes out as a liquid, but as soon as it hits the roof, it starts to expand. They will spray it in a layer that’s usually about one and a half inches thick, but it can be a little more or less. The goal is to cover the entire surface of your roof evenly, which takes skill and experience. Think of it like spraying whipped cream on a cake, making sure every bit is covered. This foam will stick tightly to your roof and start to form a strong, new layer.
Foam Expansion: Filling Cracks and Gaps
One of the most impressive things about spray foam is how much it expands and its ability to fill in any cracks, gaps, or little holes that might be in your old roof. This is extremely helpful because these small openings are often where water can sneak in and cause leaks. The expanding foam acts like a sealant, closing up all these pathways. It even seals well around tricky spots on your roof, like skylight windows or round exhaust vents. This means your new roof will be one solid piece with no easy way for water or air to get through.
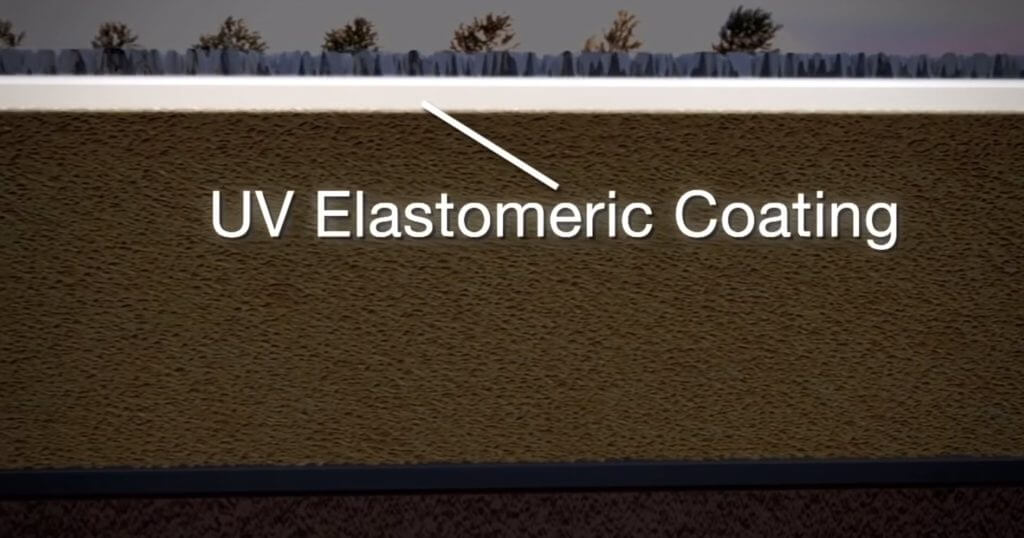
Adding Protection: The Elastomeric Coating
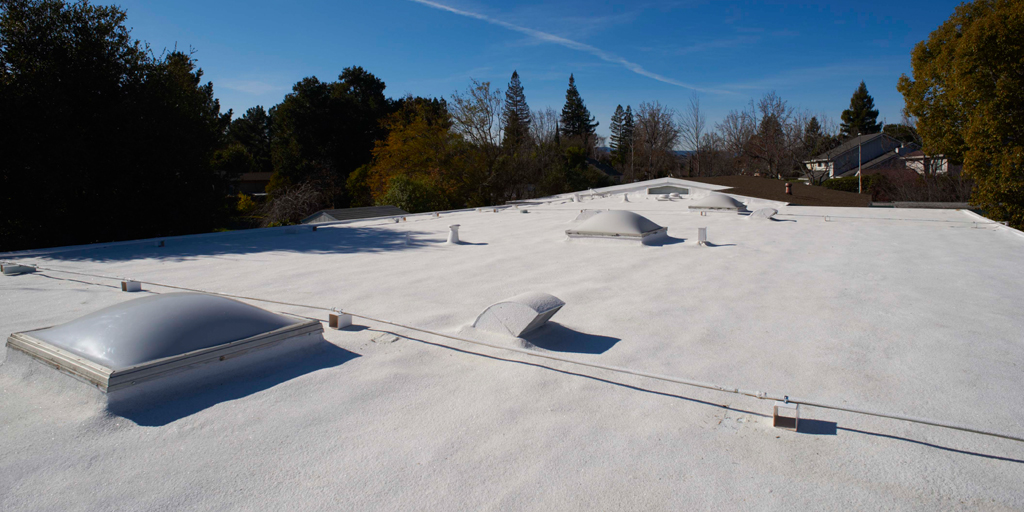
The foam layer is strong, but it needs extra protection from the UV radiation of the sun, rain, and wind. So, after the foam is in place, the Armstrong Foam Roofing technicians will spray 2 coats of AWS ultraviolet protective coating. This coating is called an elastomeric coating, which is a fancy way of saying it’s stretchy and durable. This coating acts like a shield for the foam. Without it, the sun’s UV rays could slowly damage the foam over time. This protective layer helps your roof perform like new for about 20 years before you might need to think about recoating it.
Giving Your Roof Extra Defense: Granules
For additional protection, different color granules are added on top of the wet coating. These granules help to avoid damage and reflect the heat. They create non-slip surfaces to improve safety for maintenance workers, increase impact resistance against damage from branches and sharp objects, and can be applied in double layers to create designated walkways on busy roofs with frequent service traffic. These walkways help direct foot traffic to specific areas and strengthen those sections for better long-term durability of the overall roofing system. What’s more, they can add color to your roof since they are available in white, light grey or tan.
How Long Does the Installation Take?
The time it takes to put on a spray foam roof can change depending on the size of your roof and how complicated it is. However, because the process involves cleaning, spraying foam, and adding the protective layers, it usually takes a few days. The Armstrong Foam Roofing crews try to get the job done efficiently so you can enjoy your new roof as soon as possible. They need to make sure each step is done correctly, and they also need to wait for the foam to dry before adding the coatings.
Basic Maintenance for Foam Roofs
Your spray foam roof should be relatively easy to maintain. However, there are a few things you should do to keep it in good condition. It’s a good idea to keep your roof clean from things like leaves and other debris that can accumulate. You should also make sure that water can drain off your roof properly by checking and cleaning drains and gutters at least twice a year. Even though a foam roof can hold some water without damage, it’s best if the water flows away like it’s supposed to.
Checking for Problems: What to Look For
Every now and then, especially after significant storms or weather events, you should check your roof for any damage. Look for things like cracks or holes in the protective coating, maybe caused by tree branches or other projectiles. Luckily, spray foam roofs are quite tough, so a branch would have to go all the way through to the original roof before water could really get into your house, which is not very common. If you do see any damage, it’s important to fix it quickly to stop it from getting worse.
Why Choose Foam Roofing? The Benefits
There are many reasons to choose spray foam roofing, with the most significant being that it’s great at keeping your house insulated, which can help you save money on heating and cooling bills. It’s also waterproof, so you don’t have to worry about leaks, and it is durable and can last for many years, especially with regular maintenance like recoating. Plus, it can often be sprayed right over your existing roof, which means you might not need to pay for a messy and costly tear-off of the old roof. Moreover, it’s also lightweight, so it doesn’t put too much extra weight on your house, especially if you have an Eichler home.
Is Foam Roofing Good for Flat and Low-Slope Roofs?
Yes! Spray foam roofing is ideal for flat and low-sloped roofs. These types of roofs can often have problems with water pooling and leaks, but the seamless and waterproof nature of spray foam solves these issues. In areas like the San Francisco Bay Area that have flat or low-sloped roofs, spray foam roofing systems have become a popular and effective solution. Foam roofing is extremely suited for mid-century modern style homes like Eichlers, which are known for their flat roof designs, since it can help them stay protected and keep their unique look.
Finding the Right Foam Roofing Company in the San Francisco Bay Area
It’s crucial to choose an experienced and trusted local roofing company to install your foam roof. Look for a company that has extensive experience and has been servicing your area for years. A good foam roofing contractor will make sure your roof is installed according to the specifications recommended by the manufacturer and, as a result, offer you a long-lasting warranty. Like Armstrong Foam Roofing, a reliable contractor should also have developed an installation process that leaves nothing to chance and ensures excellent results. By doing so, your foam roof can last a lifetime and give you all the benefits you expect.
Armstrong Foam Roofing, for example, has been installing foam roofs for over 40 years and has done more residential foam roofs than any other company in America. We have developed a special 10 step process to make sure every roof is installed properly and designed to last a lifetime.

Ready to experience the benefits of a professionally installed spray foam roof? Contact Armstrong Foam Roofing today for a free, no-obligation consultation and quote. Protect your home and enjoy lasting comfort with a spray foam roof!
Frequently Asked Questions
Q1. Do I need to be home while the roof is being installed?
It’s usually a good idea to be available at the beginning and end of the project to discuss things with the roofing crew.
Q2. Will the spray foam smell?
There might be a slight smell during application, but it usually goes away quickly once the foam cures.
Q3. How often do I need to recoat my foam roof?
Typically, recoating is recommended every 15-20 years.
Q4. Can I walk on my foam roof?
While foam roofs are durable, it’s best to avoid regular foot traffic. If you need to go on the roof, be careful not to puncture the coating by wearing soft-soled shoes.
Q5. How do I know if my foam roof has been damaged?
Look for cracks, holes, or areas where the granules are missing from the coating.